Shea Butter, Argan & Coconut Oil Black Soap
- kokabeauty

- Apr 13, 2021
- 7 min read
Updated: May 23, 2024

Did you know that soap was invented around 4800 years ago?! Countries all around the world have their own unique soap recipes and production methods, steeped in culture and tradition.
No matter the country of origin, colour, shape, size or smell of soap, they are essentially the same! A mixture of oils or fats combined with a chemical called lye. Lye is the name given to a strongly alkaline substance which can be chemically manufactured or made by soaking the ashes of wood, bamboo, plantain skins, cocoa nut husks, palm leaves, kola nut pod husks, palm kernel husks or shea tree bark to name but a few! Lye helps the oil and fats combine together and is the secret to the lather, or soap bubbles!
Black soap is the name given to soaps most commonly produced in Africa. There are many varieties of African black soap, with various names; sabulun salo, ose dudu, ncha nkota, anago samina, alata samina. Did you know that not all black soap is black?! The colour can vary from light brown to black depending on the ash, additives and even boiling method used. Every country, village and even person has their own special recipe!

If you have been following me for a while, you will know that I cleanse my face using oil only. I do not wash my face with water or soap. However, for the rest of my body I love using black soap! I often find that the traditional black soap bar is very soft and easily turns to mush after a few uses. It also seems to take forever to dry out!
It's sometimes hard to know what quantity of ingredients are in shop bought black soap. I like soap bars with high quantities of fats like shea butter as I'm very keen to be as kind and gentle to my skin as possible.
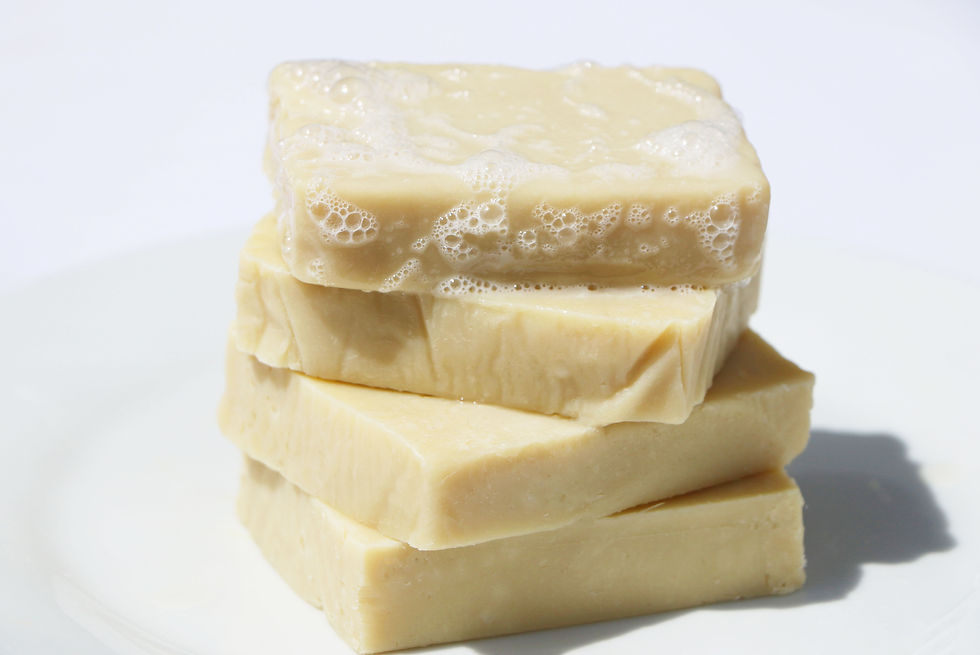
This version of black soap is.....brown!! It's made using the ashes of cocoa husks only, which is why it is has a milky, light brown colour. It does contain additives.
My recipe has a good helping of shea butter and also argan oil in it, which gives the soap very soft bubbles. It leaves the skin feeling silky smooth, but not squeaky clean. Personally, I find the smell of unrefined shea butter displeasing so I use refined shea butter which is whiter in colour and odorless. But you could use whatever kind of shea butter you like the most! Afterwards I apply oil infused in rose petals (check out my other blog post for the recipe), which gives the skin a beautiful glow and feminine smell.
This soap has no added fragrance or additives and comes out as a solid bar, which keeps its shape when wet. I've cut the soap into bars here, but if you prefer you could also roll the soap mixture into small balls, so as not to keep wetting a whole bar each time you have a bath or shower!
It is possible to make ash at home but it takes a long time and I prefer to buy it. There are many women who do an amazing job......expert ash makers and I love sourcing my ash from them. If you need some suggestions of where to buy black soap ash, let me know.
This soap recipe uses cocoa husk potash, which has about 40% lye when reconstituted with water. If you would also like a recipe for the more traditional, softer bar of black soap using plantain/shea/cocoa pods let me know! The quantity of water and oils used in the recipe is a little different as the amount of lye in the ash mix differs.
Usually I give my recipes in loose measurements, sometimes even ratios as I'm a very relaxed cook! However, for this recipe it is important to follow the measurements exactly to the gram. Lye is a strongly alkaline solution, which is corrosive to skin and surfaces. It's important to follow the recipe and also follow the precautions so as to not burn your skin.
The quantities of fats and the cooking process used to make this soap have been refined so that you can have 5 big bars of soap (4 pictured) that are safe and ready to use within 24-48 hours.
If you have any questions about this recipe or its method just reach out in the comments box. It's possible to substitute the oils and fats I have used with other types like sunflower, almond, grape seed oil, mango butter and cocoa butter. If you cant get hold of an ingredient, just give me a shout and we can work it out :-)
I use this soap once a week. I hope you enjoy trying it!
If you decide to give this recipe a go, please share your thoughts, pictures and recipe tweaks. Good luck!
Ingredients:

Notes before we get started!
This recipe makes approximately 1 block of soap (5 bars) which in total weigh approximately 800g.
I'm a big fan of simple recipes that don't need fancy equipment. For this recipe you will need a stoneware pot that can hold at least 1 litre of liquid and also a steady heat source. The key is to maintain a steady temperature throughout the soap making process. I use a crock pot on a high setting. Others use a thermometer but I prefer to give you an observational method.
Potash and the water it dissolves in is strongly alkaline. It can corrode any surface it touches, like worktops and skin, so handle with care. Long sleeved shirts and gloves are recommended. I use grease proof paper to protect my work surfaces. Its also good to have a roll of kitchen paper or a cloth you can dispose of at hand to wipe up any splashes or spillages.
I use a metal spoon to stir my soap and a large measuring jug to hold the potash/water mixture, you can use any spoon and container you like. I just make sure that this equipment is set aside only for soap making. My measuring jug has lines on it to measure volume of liquid. For this recipe a weighing scale is a must as the quantities are given in grams. Each oil/butter has a different density so its important to measure the weight of each.
If you want to speed up the cooking process, you can use a stick blender to stir the oil/water mixture. This isn't essential, but reduces the cooking time by about 30 minutes.
Lastly you will need a container to hold your soap mixture in once it is ready to pour. I use soap molds lined with grease proof paper to give the soap (pictured) its bar shape. Grease proof paper is great to use as a liner for any container as it is heat proof and does not stick to the soap when it has cooled.
Wax paper is not recommended. It sticks! You can use any container you like, or even roll the mixture into balls. If you do want to roll the mixture, this is best done when hot. I find rubber gloves very helpful to stop the hands from getting too hot!
Method
Step 1.
Protect your work surfaces and put on your protective clothing.
Step 2.
Weigh out the potash and put it into your container. Slowly add the distilled water and set the potash/water mix aside. Let it sit for 1-2 hours.This gives time for the ash to dissolve. Potash and the water it dissolves in is strongly alkaline. It can corrode surfaces it touches, so handle with care.
Step 3.
Measure out all of the oils and butter and add put them in your stoneware or crock pot. Apply a medium-high heat. This heat will remain steady until the end of the cooking process when the soap is ready.
Step 4.
Heat until the butters and oils have all dissolved.

Step 5.
Take the potash/water mixture. Check and see if it contains any lumps. if so, break these up gently with the back of a spoon.
Step 6.
Pour the potash/water mixture into your stoneware or crock pot containing the dissolved oils. Be careful that the mixture does not splash you!
Step 7.
Stir the water/oil mixture consistently as it begins to heat. At this point in the process you are stirring to combine the oil and the water mixture together. You can also use a stick blender here if you prefer. As you stir and heat, you will notice the oils and the water combining. The mixture changes colour (lighter) and texture (clumpy). It takes about 30 minutes to get to this stage (5 mins with a stick blender).

Step 8.
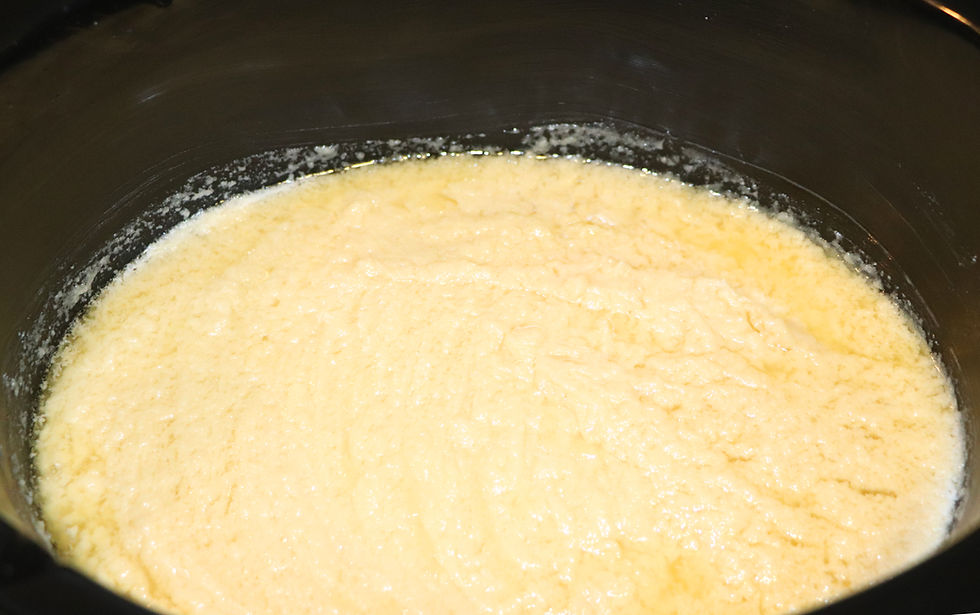
Keep stirring (no stick blender needed from this point on spoon is fine). As the mixture continues to heat in the next 20 minutes, it turns smooth, almost like mayonnaise.

Step 9.
Put a lid on the mixture and leave it for 15-20 minutes, only stirring briefly every 5 minutes. Do not leave unattended! You will notice that the mixture will begin increase, almost double in volume.

Step 10.
Take the lid off and start stirring continuously. As the mixture continues to cook another 15 minutes, you will notice that it changes appearance again, becoming glossy and thick, almost gel like. Take care not to cook the mixture past this point, as the soap may turn out dry and crumbly when it cools.
Step 11.
The mixture is ready to spoon into your chosen mold. Take care when spooning as the soap is hot enough to burn the skin! Let the mixture sit, cool and harden for 24-48 hours.
The great thing about this soap making technique is that the soap is it lathers and is actually safe enough to use straight away! You will notice when you rinse out your soap making pots that there will be lots of bubbles!
Disclaimer
I'm very passionate about the management of autoimmune conditions in a healthy way.
I speak with medical professionals, read journals, try and test new recipes to share with you and diligently undertake research online. That being said, as you know, each autoimmune disease, as well as any set of symptoms you may be experiencing are unique.
All information provided is in no way intended to be a substitute for professional medical advice. Always talk to your doctor or healthcare provider to ensure the appropriateness of any information in relation to your own situation.
And finally, please comment and share so we as a community better cope with our conditions by through growth and learning.


Comments